Quantcast
Channel: My Art – My Flower Journal
Viewing all 33 articles
Browse latest View live

Snowy Landscape With Splattered Acrylic Paint

$
0
0

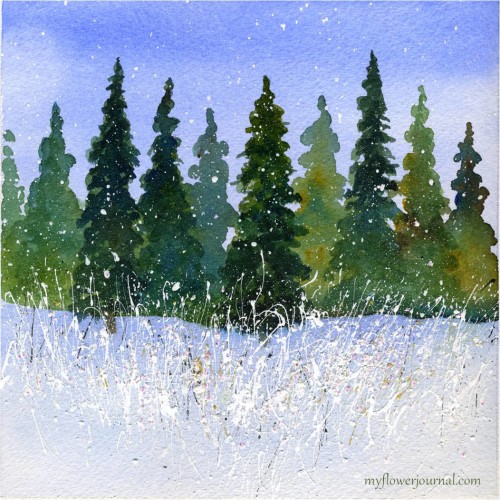
A fresh layer of snow can turn a dry field of weeds into a beautiful winter scene. Here’s a winter landscape with splattered acrylic paint on a watercolor background I created and a tutorial showing how I made it.

Snowy landscape with splattered paint on a watercolor background -myflowerjournal.com

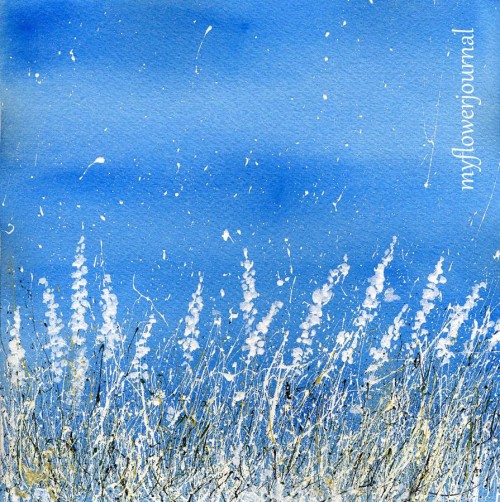
I started with a 9×9 piece of watercolor paper. I used masking tape around the outside edge making a 8×8 square for my painting. Then I did a dark blue watercolor wash over the whole paper. Remember watercolor dries lighter so make sure it is a little darker than you want. Watercolor Wash for Splattered Winter Snow Art-myflowerjournal.com

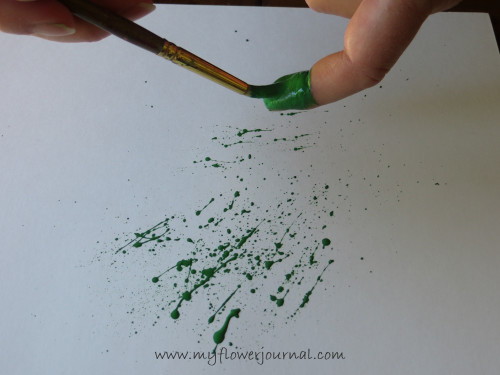
Use a size 8 round mixed media brush and load it with lots of white acrylic craft paint. Use the kind in the bottle not a tube. Flick the brush across your finger to splatter the paint. Lots of paint gives you long grass like splatters. If you get blobs of paint you don’t want let them dry. After they are dry you can scratch them off with the tip of a sharp knife knife or use them as part of the dried flowers and weeds. You can learn more about my paint splatter techniques here. Load your brush with paint and flick it across your index finger to create the splatters for your splattered paint art-myflowerjournal.com

Snowy Landscape Splattered Paint Art in Progress-myflowerjournal.com

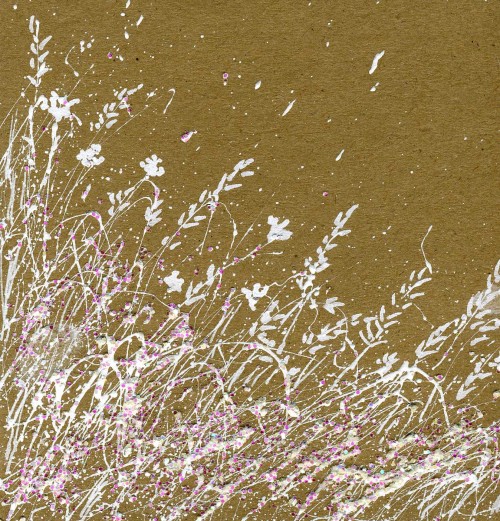
After the splatters dry add dabs of paint to create the look of dried weeds and wild flowers covered with snow.

Tutorial: Winter Watercolor of Snowy field with Splattered Acrylic Paint-myflowerjournal.com

It looks pretty like this and could be finished, but I decided to add a little color so I splattered  brown and dark green paint near the bottom of the painting. Then I splattered  more white on top. I also added more white on the dried weeds covered with snow.

Snowy landscape with splattered paint on a watercolor background -myflowerjournal.com

Shared on French Country Cottage, My Romantic Home, Paint Party Friday

The post Snowy Landscape With Splattered Acrylic Paint appeared first on My Flower Journal.


Splatter Painting At A Different Angle

$
0
0

Your splatter painting will take on a whole new look if you turn your paper and try splattering at a different angle. I think this direction looks best when you are working on a square background. I’ve used the same techniques shown in earlier posts.
Splatter Painting from a different angle-myflowerjournal


Try a different angle splatter when splatter painting-myflowerjournal.com

A Differnet Angle on Splatter Painting-myflowerjournal Snow Flower Art created with white acrylic paint splattered on craft paper with glitter added-myflowerjournal.com

On this piece.I call Snow Flower,  I sprinkled some glitter on before the paint dried. It looks pink in the photo,but I used a clear iridescent glitter. I wanted to give it the look of fresh snow glittering in the sun.

Two more ideas are found here and here.

The post Splatter Painting At A Different Angle appeared first on My Flower Journal.

Pastel Splattered Hearts for Valentines

$
0
0


Valentine conversation hearts add so much color to the month of February! Inspired by the bins of Valentine candy I saw at the grocery store I  made some pastel splattered hearts for Valentines Day. They can be used to make cards, garlands or for other valentine creations. Inspiration for splattered pastel valentine hearts-myflowerjournal

Valentine Pastel Splattered Hearts-myflowerjournal.com

First I did some washes of watercolor on watercolor paper. You could skip this step and use pastel colored cardstock, but I like the texture and variation in color a watercolor wash gives.

Watercolor backgrounds for splattered paint hearts-myflowerjournal

Use a size 8 round acrylic brush and splatter white acrylic craft paint on your paper. Use acrylic craft paint found in a bottle not a tube. Load your brush with lots of paint and flick it across your finger. Turn your paper different directions so the splatters have a random feel to them. Here are some tips making a messy project like splatter painting easier to clean up.

Load your brush with paint and flick it across your index finger to create the splatters for your splattered paint art-myflowerjournal

Splattered acyrlic paint on a watercolor background for valentine hearts-myflowerjournal

After the paint splatters dry use a heart shaped stencil or cookie cutter and trace hearts on your splattered paper.After you cut them out you can use a white gel pen or Sharpie paint pen to add some small white hearts. Valentine Pastel Splattered Hearts-myflowerjournal.com

Here are some more Valentine art ideas: Watercolor Hearts and Roses, Watercolor Heart and Flower Wreath, Splattered Paint Cards

Shared on Savvy Southern Style

The post Pastel Splattered Hearts for Valentines appeared first on My Flower Journal.

Inspirational Quotes On Beautiful Backgrounds

$
0
0

I’m always on the watch for inspirational quotes to add to my growing collection. Recently I started using two apps on my ipad to edit and embellish my photos. I have fun turning them into beautiful backgrounds and adding favorite quotes.Here are some inspirational quotes on beautiful backgrounds I created using my own flower photos and apps on my ipad. You are welcome to download them for your own personal use. If you use them please give me credit by including my name and  linking back to my web site. You can see more inspirational quotes on my instagram feed. An Inspirational Quote on a beautiful background created on my ipad from my own flower photo and favorite apps-myflowerjournal.com Favorite inspirational quote on a flower background created on my ipad from my own photo and favorite apps-myflowerjournal.com Inspirational Quotes on Beautiful backgrounds created on my ipad from my own photos and favorite apps-myflowerjournal.com Inspirational Quotes on Beautiful backgrounds created on my ipad from my own flower photos and favorite apps-myflowerjournal.com

The apps I like to use are Rhonna Designs and Waterlogue. When you open the Waterlogue app  select a photo from your camera roll. Then watch it draw and paint your photo in watercolor. Its amazing and very simple. In a mater of seconds you can have a beautiful watercolor picture. In Rhonna Designs I can crop the photo, add text and embellish my photos with fun graphics. Rhonna has some great tutorials on her website. She shows you all the creative things you can do with her app. I like to combine both of these apps making a watercolor image first, saving it to my camera roll then adding text and graphic elements  in Rhonna Designs. Here are some before during and after photos to help you understand the process. How to create Inspirational Quotes on beautiful backgrounds using favorite apps on my ipad to edit my own photos-myflowerjournal.com

The post Inspirational Quotes On Beautiful Backgrounds appeared first on My Flower Journal.

A Fun Summer Art Activity

$
0
0

Are you looking for a fun summer art activity? Grab some index cards and a few art supplies and join me and hundreds of others who are participating in the Daisy Yellow Art Index Card A Day Challenge. It officially starts on June 1, 2015, but if you are anxious like me there are some warm up exercises you can do. The idea is to do something creative on a 3×5 index card every day for 61 days. There will be prompts for children and adults.  I’ve been gathering my supplies and trying some new things. I decide to experiment with my Tombow Markers. I found I can make beautiful backgrounds by coloring the index cards with the Tombow Markers, mist them with water and let them dry. I think you could use this technique with any water soluble marker.The cards curl up when they are wet, but flatten as they dry.  Here are some practice cards I created with step by step photos. Playing with my Tombow markers and acrylic paint getting ready for the Index Card A Day challenge-a fun summer art activity-myflowerjournal.com Tombow Markers spayed with water for background with flower doodles on top -a fun summer art activity-myflowerjournal.com Step by step Tombow Markers spayed with water for background with flower doodles on top for a fun summer art activity-myflowerjournal.com

After it was dry I did some flower doodles with a white Sharpie Paint Pen. Splattered Acrylic paint foliage with flowers created with Tombow Markers sprayed with water for a fun summerart activity-myflowerjournal

For this one I started by splattering green acrylic paint on the card. After the splattered paint was dry I added the flowers with the Tombow Markers then sprayed them with water and let them dry. (Splatter Paint Tutorial) Step by Step Splattered Acrylic paint with flowers created with Tombow Markers sprayed with water for a fun summer art activity-myflowerjournal.com

Here is one more done the same way. Splattered Acrylic paint foliage with flowers created with Tombow Markers sprayed with water for a fun summer art activity-myflowerjournal

Tombow Markers sprayed with water to give them a softer look. I used this design for my title card for the Index Card A Day Challenge-a fun summer art activiity-myflowerjournal.com   My title card created with Tombow markers for the Index Card A Day Challenge-a fun summer art activity-myflowerjournal.com        I used my sewing machine to add a title banner and some stitches for texture.


I will be sharing this on Paint Party Friday, Art Journal Every Day, French Country Cottage

The post A Fun Summer Art Activity appeared first on My Flower Journal.

FAQ to Create Splattered Paint Flower Art

$
0
0

Two years ago I shared my first post on how to create splattered paint flower art. It continues to be my most popular post and bring lots of traffic to my blog each day. Thank you for all your kind comments and the questions you have asked the past couple of years.  I get asked some questions frequently. I thought I would share some of these today and hopefully make it easier for you to create your own splattered paint flower art.

Create a splattered paint flower garden-no drawing required-myflowerjournal.com (2) What kind of brush do I use? I use a size 8 round brush (700R-8) I purchased at Hobby Lobby. It is an oil and acrylic brush in the Master’s Touch Series. I have a couple of them and they are both looking a little worn out, but continue to work great.

FAQ to create splattered paint flower art-use a size 8 round brush-myflowerjournal.com FAQ to create Splattered Paint Flower Art-the brush I use-myflowerjournal.com How do I create the long grass like splatters?  I think the paint you choose makes the biggest difference. It does not work to use acrylic paint from a tube. Acrylic craft paint works the best. If it is getting a little old and a little thick it won’t work as well. Here is some of the paint I am currently using to make my green splatters. I use a variety of greens, but these are two of my favorite colors.  FAQ to create splattered paint flower art-my favorite green colors-myflowerjournal.com       I had my daughter video my doing some paint splatters. It is a very short simple video (no sound), but will help you see how I splatter the paint. It also shows how I keep the splatters from getting all over my work area. I have some tips for easy clean up here .

I keep finding more ways to use my splattered paint flower art. Some the ideas I’ve shared are shown below. Splatter Painting from a different angle-myflowerjournal Splatter Painting From a Different Angle Splattered Paint Flower Garden Cards-myflowerjournal (1)

Splattered Paint Flower Cards

Splattered Paint Flower Art Ideas -Sunset-myflowerjournal.com More spattered paint ideas and tips. Splattered Paint Background with wildflowers added with markers-myflowerjournal

Splattered Paint Flowers using markers. Winter Wondrland Watercolor with Splattered Acylic Paint-myflowerjournal Winter Splattered Paint Art


The post FAQ to Create Splattered Paint Flower Art appeared first on My Flower Journal.

Forget-Me-Not Flower Art and Quote

$
0
0

While we were visiting Alaska a few months ago I learned that Alaska’s state flower is the Forget-Me-Not. This beautiful flower symbolizes enduring love. In 15th-century Germany, it was said that whoever wore the little flower would not be forgotten by their lovers. Legend has it that in medieval times, a knight and his lady were walking near the side of a river. He picked a bouquet of flowers for his love, but because of his heavy armor he fell into the river. As he was drowning he threw the flowers to his lady and shouted “Forget-me-not.” Inspired by this small blue flower I created a watercolor flower wreath and a splattered paint garden scene. Both of these projects are easy to do and don’t require any drawing skills. I also have a beautiful quote to share with you. Forget Me Not Flower Art-Watercolor Flower Wreath-myflowerjournal.com

You can follow a step by step tutorial to create a watercolor flower wreath here.

Forget Me Not Splattered Paint Flower Art-myflowerjournal.com

I share lots of splatter paint flower art and tutorials here.

Forget Me Not Flower Quote-myflowerjournal.com   You can read more about Dieter F. Uchtdorf and where this inspiring quote came from here.

Shared on Savvy Southern Style

The post Forget-Me-Not Flower Art and Quote appeared first on My Flower Journal.

The Polaroid Zip Mobile Printer for On The Go Projects

$
0
0

I love to use my Polaroid ZIP mobile printer to print photos for my travel journal or other on the go craft projects. Its small enough to fit in my pocket or purse yet prints great quality 2×3 inch photos. The photos have a sticky back that makes it easy to put them on the pages of my travel journal.Poloroid ZIP Mobile Priner Review by myflowerjournal.com I love this pocket size printer for printing photos for my travel journal and other fun projects.When I travel I like to collect brochures, maps and postcards to put in a travel journal. On a recent trip I took a Polaroid Zip printer and had so much fun printing some of the pictures I took on my iPhone and putting them in my journal. It didn’t require scissors or a glue stick, just my phone, the printer and blue tooth. The printer is simple to use and easy to take with you. You don’t need any ink cartridges. The magic is in the ZINK photo paper. Considering the size of the printer the photos are good quality. At first I was disappointed the color was a little off and tried to adjust the color before printing, but I found I wasted paper and time. Compared to the image on my phone the color was a little different, but not too bad. It is meant to be a instant print like the old Polaroid cameras not a studio print. When my journal was all done and the photos were mixed in with the collages I created from brochures and little watercolors I added I was happy with the end result.I love using my Poloroid ZIP mobile printer to print photos from my iphone or ipad to use in my travel journal or for other craft projects-myflowerjournal      You can see some of the photos I printed for my travel journal here. I also decided to try printing some scanned images of my art. I was pleased with how they turned out and put them on some Strathmore Cards. They make beautiful, simple cards. I plan to try making some gifts tags for presents and packages as well. I’m sure I will continue to find more fun ways to use this great little mobile printer.

The post The Polaroid Zip Mobile Printer for On The Go Projects appeared first on My Flower Journal.


How To Create Flower Heart Art With Splattered Paint

$
0
0
How To Create Flower Heart Art with Splattered Acrylic Paint-myflowerjournal

I am always looking for new ways to use splattered paint to create art. With Valentines Day less than a month away I added some flower hearts to paint I splattered on a gesso board.I started with a 6×6 inch Ampersand Gessobord. I painted the background with Golden Acrylic Teal mixed with lots of white. Then using a size 8 round brush load your brush with lots of green paint. It needs to be round brush with stiff bristles for best results. I have tried many different brushes for splatter painting and this is the one that works best! Use plenty of paint. A brush filled with lots of paint produces the long grass like splatters, with less paint you get fine speckled splatters.  I used Martha Stewart Satin paint in Green Olive and Seaweed. Here’s a video showing how I splatter.

After the green splatters dried I used intense, bright colored acrylic paints to make the flowers. That way I can mix them with white to get different shades. I used a size 2 round brush for all the flowers. The heart flowers are two strokes with the round brush to make a “V” or heart shape. The purple flowers were created with little dabs of paint. After the flowers dried I put a watery bright green paint in a few places and finished with a few splatters of pink and purple with the size 8 brush. You can read more about the paint colors I use here.You can follow the same steps and create splattered flower heart art on journal pages, gift tags or cards.

You can see more splattered paint flower art here.

FAQ about Splattered Paint Flower Art here.

Tips for easy clean up here.

Free Printable to create your own heart flower art here.

I will be sharing this on Feathered Nest, Inspiration Gallery, Romantic Home, Paint Party Friday, Savvy Southern Style. A Stroll Thru Life, StoneGable

The post How To Create Flower Heart Art With Splattered Paint appeared first on My Flower Journal.

Free Printable For Splattered Paint Flower Art

$
0
0
Free Printable For Splattered Paint Flower Art

I have a free printable to share with you.  I splattered some paint, scanned it, then created a printable image.  You can download and print it then add flowers with markers or paints to create cards, gift tags, valentines, framed art or add to an art journal. Below you’ll see examples of how to use it and get access to the printable.

I printed these samples on 110lb white card stock on my printer. The image is 6×6 inches. You can re-size it or crop it to fit your needs. Inspired by the post I did last week I added heart shaped flowers. Heart shaped flowers are very easy to add with markers or watercolors. With this printable (click here to download) you or your children could make unique and original valentine cards or gift tags for treats. I hope yours turn out as well as mine. All printers seem to print a little different. My printer is not an expensive one, but I was happy with how the image looked after I printed it.Adding heart shaped flowers with your favorite makers is quick and easy. I love my Faber-Castell Brush Pens. This set of 24 has beautiful colors to choose from and the ink is waterproof if I want to combine them with watercolors.

For this one I wanted to add some larkspur or delphinium type flowers. Watercolor works well to make these flowers. I used my Koi watercolor set. I have had this set for years and love its small size with plenty of room for mixing colors. Over time I have replaced some of the colors with my favorite watercolors from a tube, but this set as it comes is a great set to use for small projects. I used a waterbrush to paint the hearts and add dabs of purple for the other flowers. I also added a bright yellow green I mixed to the background.

Now it’s your turn to have fun! Get your free printable by clicking here.

I will be sharing this on Feathered Nest, Inspiration Gallery, Romantic Home, Paint Party Friday, Savvy Southern Style. A Stroll Thru Life, StoneGable Tweak It Tuesday

The post Free Printable For Splattered Paint Flower Art appeared first on My Flower Journal.

Splattered Paint Flower Art Using Golden Fluid Acrylics

$
0
0
Splattered Paint Flower Art done created Golden Fluid Acrylics-myflowerjournal

The Splattered Paint Flower Art I’m sharing today was all created with Golden Fluid Acrylic paints. A question I am asked often is what type of acrylic paint I use. I have used a lot of different brands of acrylic paints over the years for my splattered paint flower art. Sometimes I use a variety of brands in one painting. The most important thing to look for is a fluid acrylic paint, not acrylic paint in a tube.

At the end of this post you can enter a drawing to win this 6×6 inch Splattered Paint Flower Art.

Golden Fluid Acrylic paint is the most expensive brand I use. Other less expensive brands work as well, but Golden’s intense colors can’t compare to most other brands. The three splattered paint flower art pieces in this post were made with the Golden Fluid Acrylics.  I painted them on gesso board or watercolor postcards.

I use the colors in this
After I paint the sky and ground color I splatter green paint with a size 8 round brush. You can learn more about how I do this here. After the paint has dried I add dabs of flower colors to create a variety of flowers. If I have splatters I don’t like I can cover them with flowers.  I keep adding flowers and sometimes more greens and a few splatters in the flower colors. After it dried for a day I sprayed it with Golden Matte Varnish to protect it.

Click here to view this promotion.

I’ll announce the winner next week!

I will be sharing this on Feathered Nest, Inspiration Gallery, Romantic Home, Paint Party Friday, Savvy Southern Style. A Stroll Thru Life, StoneGable, Cozy Little House

The post Splattered Paint Flower Art Using Golden Fluid Acrylics appeared first on My Flower Journal.

Free Butterfly Printable and Watercolor Tutorial

$
0
0
A butterfly painted in watercolor using the free butterfly printable from my flowerjournal

I have a free butterfly printable for you and a tutorial showing you how I used it to paint some watercolor butterflies.

Inspiration

I loved visiting Butterfly Wonderland in Scottsdale Arizona and couldn’t wait to paint some watercolor butterflies. Using the photos I took I drew a basic butterfly, scanned it and printed it on Mixed Media paper. Drawing isn’t my favorite part of the process. I am always anxious to get my paints out and start adding color. I decided if I had one good butterfly drawing I could use it to paint a variety of butterflies to frame or use as cards. You can download this free butterfly printable here.

Supplies

Mixed Media Paper, Watercolors, Watercolor Brushes, Extra Fine Black Pen, White Gel Pen

Step by Step Tutorial Using Free Butterfly Printable

1. Print the butterfly printable on 140# Mixed Media Paper. For my printer I trimmed the paper to 8 1/2 x 11.

2. Use an ultra fine marker or watercolor to go over the lines you want to use. I found the ink from my printer became so light after I did a watercolor wash I couldn’t see it very well to finish the butterfly details.

3. Keep adding color until you are happy with your butterfly. It works best to paint a layer, let it dry then add more paint. I used my butterfly photos as inspiration, but didn’t try to make an exact copy. It was more fun to be creative. In the example above you can see how my butterflies progressed from the ink and initial wash to adding more colors, details and splatters. The Koi Watercolor Set had the perfect blue for my blue butterfly.

4. Add more details with a fine black marker or white gel pen.

5. If you get some drops of paint on the background where you don’t want it add some decorative splatters and it will blend in.

6. Frame your butterfly art or use them as cards or postcards.

More Ideas

  After I finished this one I didn’t care for it. I put it away and didn’t look at it for a few days. I got it out when I was writing this post and decided it wasn’t that bad. It looks a little more like a moth than a butterfly. Sometimes it helps to step away from projects or put them away then look a them after time has passed.

Butterfly Books that will give you some ideas: 

I would love to see what ideas you come up with. Share your creations on instagram #watercolorbutterfly.

Free Butterfly Printable Here!

I will be sharing my free butterfly printable on  Feathered Nest, Inspiration Gallery, Paint Party Friday, Savvy Southern Style. A Stroll Thru Life, StoneGable, Cozy Little House.

The post Free Butterfly Printable and Watercolor Tutorial appeared first on My Flower Journal.

Daffodil Doodles In 4 Easy Steps

$
0
0
You can create this beautiful Daffodil Splattered Paint Flower Art using the easy 4 step daffodil doodle tutorial from myflowerjournal

Daffodil Doodles are easy to paint in watercolor or acrylic if you follow these 4 easy steps. You can use your daffodil doodles to make cards, journal page borders or framed splattered paint art.

Daffodil Doodles Easy 4 Step Tutorial

  1. Using watercolor or acrylic paint choose a  darker yellow or orange to paint the center of the daffodil. Most daffodils look slightly down or straight out-not up. Refer to my example above to copy the shape. Keep the bottom edge uneven to give it a more natural look. Vary the direction the center part of the flower faces. You can do a few that look like they are facing forward making a circle shape for the center.
  2. Add a few lighter yellow petals to the back and sides of the center you painted.
  3. Add the stem. If you look at a daffodil example above or my inspiration photo below you can see that the stems come out straight out from the back of the flower then bend and go straight down. Painting the stem this way helps identify it as a daffodil.
  4. Last I added some leaves and a few dabs of purple paint to look like pansies, dabs of brown for dirt and a few paint splatters in yellow and purple.

I used these 4 steps to create daffodils in watercolor and acrylic paint, but you could do the same thing with brush markers. I did not draw anything with pencil first. I did all of the daffodil doodles with a brush and paint. They were quick and easy to make and would make great cards, gift tags, journal borders or framed art.

Inspiration Photo I Took In The Gardens At Temple Square in Salt Lake City

My husband and I were recently in Salt Lake City and visited the beautiful gardens at Temple Square. There were lots of daffodils blooming surrounded by purple pansies. This is one of the many photos I took that day and the inspiration for my daffodil doodles. Often when I create my splattered paint flower art I paint random flower shapes in a variety of colors. As I looked at this photo I decided to try a splatter painting with daffodils as the main flower accented with purple pansies.

Splattered Paint Flower Art With Daffodil Doodles

I started with a 6×6 ampersand gesso board and painted the sky then splattered the green and let it dry. You can read more about my process and the paints and brush I use here. After it was dry I painted the daffodils using the 4 steps outlined above. I added stems with the bend characteristic of daffodils. Then I brushed on more leaves and added dabs of purple paint for the pansies and few little yellow centers. I also added a little brown for the dirt. To finish I splattered some yellow then purple paint.

If you want to read a charming book about daffodils you can read my review here.

I will be sharing this on Feathered Nest, Inspiration Gallery, Paint Party Friday, Savvy Southern Style. A Stroll Thru Life, StoneGable, Cozy Little House

The post Daffodil Doodles In 4 Easy Steps appeared first on My Flower Journal.

The New Koi Watercolor Pocket Set

$
0
0
The New Koi Watercolor Pocket Set

I love my new Koi Watercolor Pocket Set and the 30 colors it now includes. I have used my Koi set of 24 colors  for years for on the go or quick projects.Recently Sakura  added 6 new colors to their small, portable watercolor set without changing the size. Plus, it still includes a medium size water brush.

Color Chart for the Koi Watercolor Pocket Set

I made a color chart on a 4×6 watercolor postcard that I can keep with my set. It fits perfectly inside the lid. These are the colors in the order they are on the card. The ones with the (*) are the new colors. Starting with the top row:

Chinese White, Lemon Yellow, Aureoline Hue, Permanent Yellow*, Permanent Yellow Deep, Permanent Orange

Jaune Brilliant, Vermilion Hue, Cadium Red Hue, Crimson Lake, Quinacridone Rose, Purple

Cobalt Blue Hue, Cerulean Blue Hue, Ultramarine Deep, Turquoise Blue*, Prussian Blue, Indigo*

Permanent Green Pale* (replaced Yellow Green), Permanent Green*, Viridan Hue, Sap Green*, Olive Green

Yellow Ochre, Light Red, Burnt Umber, Sepia*, Payne’s Gray, Ivory Black

Practicing with the Koi Watercolor Pocket Set

After I finished my my color chart I played with the colors and made some watercolor flower post cards. The tutorials for how I make my watercolor flowers can be found here and here. I love working on watercolor postcards. I like to practice new techniques or ideas on them. If I like how they turn out I can use them as cards or gift tags. The bright pretty colors in this set work well for painting flowers. There is  plenty of room for mixing colors. The removable tray can be placed on the left or right or even in the front of the paint colors. The lid can be used to mix colors or hold your color chart or a the watercolor postcard you are working on. Since the water brush fits inside you don’t need a lot of space to store your supplies for your on the go watercolor projects.

I will be sharing this on Feathered Nest, Inspiration Gallery, Paint Party Friday, Savvy Southern Style. A Stroll Thru Life, StoneGable, Cozy Little House

The post The New Koi Watercolor Pocket Set appeared first on My Flower Journal.

Free Succulent Printable To Color

$
0
0
This is a great free succulent printable that you can color or paint. I used mine to make cards, but it would also look great framed. From myflowerjournal

Everybody is coloring these days as a way to relax and play with colors. On my daughter”s web site, Succulents and Sunshine, she has a free succulent printable that you can download, print, color and use for framed art, cards or postcards. 

How I Used The Free Succulent Printable from Succulents and Sunshine

  1. Download the Free Succulent Printable here.
  2. Print it on 4×6 paper of your choice. I used this photo paper and printed mine on this printer.
  3. I used the Koi Watercolor Set with 24 colors to paint mine. (Now I have a new Koi set with 30 colors. Read more about it here.) When using watercolor leave some white space for highlights. Remember watercolor dries lighter so keep your colors intense. Have a scrap of white paper nearby where you can test your colors and get them just right before you paint them on your card. Have fun mixing and trying new colors. You can use your imagination. Your succulents don’t have to look exactly like the ones you would buy at a nursery. Some succulents change colors depending on the season and weather. Be creative!
  4. When my succulent printable was dry I placed it on my ironing board, paint side down. Next I placed a piece of white copy paper on it then used a warm iron to flatten and smooth it. The photo paper I used took the water fairly well, but wrinkled a little bit as it dried. You may want to print yours on Mixed Media Paper then trim it to size. My printer wouldn’t print on watercolor postcards.
  5. I love working on the small 4×6 size. The small size makes it a quick and portable project. The finished piece can be framed in a standard 4×6 frame or used as a card or postcard.
  6. I attached my finished succulent art to a watercolor card using black photo corners. I love how the black photo corners gave it a nice finished look.I will be sharing this on Feathered Nest, Inspiration GallerySavvy Southern Style. A Stroll Thru Life, StoneGable, Cozy Little House

The post Free Succulent Printable To Color appeared first on My Flower Journal.


Watercolor Protea Bouquet

$
0
0
My watercolor Protea bouquet was inspired by the 31 Days of Flowers Challenge created by Brittany of from The House That Built. I love her free flower drawing video tutorials-myflowerjournal

Flower Drawing Challenge

I have had fun following the 31 days of Flowers challenge on the House That Lars Built. Each day during the month of May Brittany has shared a short video showing how to draw a type of flower. She also shares a few fun facts about each flower. I really enjoyed learning more about the Protea and Pincushion Protea. I have seen Proteas in arrangements and bouquets, but I didn’t know the name or much about it. After watching Brittany’s tutorials I drew a Protea bouquet then added watercolor to finish it. If you want to improve you flower drawing skills  you can watch her free tutorials on You Tube. Brittany also has a beautiful Flower Coloring Book. Some of the flowers she shows how to draw in this challenge are included in her book.

You can read about my favorite watercolors here and here.

The post Watercolor Protea Bouquet appeared first on My Flower Journal.

4 Flower Art Activities For Summer Fun

$
0
0
4 Flower Art Activities For Summer Fun

If you love flowers and art like I do you will want to try these 4 flower art activities this summer. 

4 Flower Art ActivitiesUse a sharpie markers to add flower doodles to canvas shoes. Instructions here.
Look for flower inspiration from your garden to create flower chalk art. Some tips to make it easier are here.

Create a beautiful garden scene using flowers made from old book pages and splattered acrylic paint. You can see how I did it here.

Learn how to do bubble painting on watercolor paper then add flower doodles for fun summer art here.

The post 4 Flower Art Activities For Summer Fun appeared first on My Flower Journal.

Watercolor Flower Doodles on Splattered Paint

$
0
0
How to do watercolor flower doodles on splattered acrylic paint on myflowerjournal.com.Children can learn to do this too! Its a great summer activity for all ages.

Watercolor Flower Doodles On Splattered Paint

I love to do watercolor flower doodles. When I doodle I like to have a paint brush in my hand instead of a pen or pencil. My Koi watercolor set and water brush is perfect for this. Its hard for me to know where to start when I have a blank paper in front of me so I like one that has some acrylic paint splattered on it. Sometimes I spend an hour and splatter paint on 20-25 4×6 watercolor postcards.If I don’t have any postcards I cut a large piece of watercolor paper into 4×6 cards. Sometimes I splatter two different greens on the same card. Other times I just use one color of green and only do a few splatters to give variety. You can learn how I splatter paint here.I let them dry then store them with my on the go watercolor kit. When I have a few extra minutes and want to play with paint I can pull one out and do some flower doodles with my watercolors. I experiment with different colors and types of flowers. I love the free flower drawing video tutorials from The House That Lars Built. I also look on google images for wild flower ideas. Then I practice and experiment. If I don’t like how one turns out I’m not out much and I throw it away. If I like the finished results I can use it to write a note to a friend or put it with a gift. Poppies, delphiniums, tulips and hollyhocks are some of my favorite flowers to combine with the paint splatters. They all grow in nature in a variety of colors on tall stems. Sometimes I use my imagination and create pretty colorful flowers that I can’t name. Daffodils also work well. You can find my step by step tutorial for daffodil doodles here.If you don’t want to splatter green acrylic paint you can download a free printable of splattered paint that I did here. I will be sharing my free butterfly printable on  Feathered Nest Friday, Inspiration GallerySavvy Southern Style. A Stroll Thru Life, StoneGable, Cozy Little House.

The post Watercolor Flower Doodles on Splattered Paint appeared first on My Flower Journal.

6 Heart Themed Art Tutorials

$
0
0
Take a look at myflowerjournal.com for 6 fun and easy heart themed art tutorials

I have compiled 6 of my heart themed art tutorials that you can use to create some fun and easy projects for Valentines Day. They are great activities for all ages. 

Click on each picture below for the tutorial.

The post 6 Heart Themed Art Tutorials appeared first on My Flower Journal.

Journal Borders and Watercolor Pencils

$
0
0
7 journal borders and tips how to color them with watercolor pencils from myflowerjournal.com

Journal Borders

Journal borders are a fun way to add color to cards, journals, planners and art. I was cleaning out a file in my art room and found a page of journal borders I had doodled and colored years ago. It was so fun to find them. Luckily I written a few notes on the back reminding me how I had colored them. The first two were done with Derwent Watercolor Pencils. The rest were colored with my Prismacolor pencils.

Watercolor Pencils

You might want to get some watercolor pencils and experiment with them. First, lightly draw your border with a pencil. After you are happy with it you can go over it with a fine tip permanent black pen. Next add color with markers, colored pencils or watercolor pencils. When you are finished you can add highlights with a white gel pen.

If you decide to try watercolor pencils color your border like you would with a colored pencil. Color lightly or in just a few areas. If you look at the example above I only put the turquoise color on the center design. You can use more than one color and blend them as you color or when you add water. After you have added some color use a water brush and go over the watercolor pencil blending the different colors and filling in the spaces you want color. Look how much turquoise is in my border above even though I didn’t color heavy with the watercolor pencil.

The example above shows the progression of the border:

  1. Outline in pen
  2. Color lightly with watercolor pencil
  3. The finished step with the watercolor pencil blended with a water brush.

Don’t be afraid to leaves some white space. If you want areas to be darker or have more color you can go back over them with the watercolor pencil. You can even apply the watercolor pencil to wet paper.


You can find more ideas for journal borders 

The post Journal Borders and Watercolor Pencils appeared first on My Flower Journal.

Viewing all 33 articles
Browse latest View live